Apple Lady Recipe

January 4, 2018

Apple Lady2

This is everything I like about apple pie(s), and none of the things I don’t enjoy. Because you are making a portion of it almost as a “sauce”, the remainder of the apples don’t need to be cooked.  You don’t need (nor should) to pre-bake either of these crusts. Since you are using multiple apple varieties with different aspects of tartness, sweetness, and toothiness, you get a more complex dish – because you aren’t cooking them first you don’t get mushiness everywhere.

Apple Lady

6-8 lbs of apples; use 4 or more varieties

3 sticks of unsalted butter

2 cups of dark brown sugar

1 pear, preferably very ripe

1 bottle of J.K. Scrumpy’s hard cider

Cinnamon, mace, ground ginger, allspice, clove to taste

1 lb walker’s shortbread (3 5oz packages are fine)

Springback pan, large (10″)

First, a word on the apples.  I use multiple apple varieties to get more complex texture and taste, rather like using more varieties of chilis when making a good chili. This last time I used Honeycrisp, Granny smith, Gala, and Fuji apples. I’ve also used Macintosh and Staymans, and others.  Do not use any red or yellow delicious apples, ever.

  • Cooking Mixture:

Combine the butter, brown sugar, half-bottle of hard cider, spices, the pear (chopped), and 2 apples (chopped) in a pot to bring to a boil, simmer for about 10-15 minutes.

If you do not use scrumpy’s or another very apple-y-tasting cider, then add a cup or two of fresh squeezed / juiced apple juice or fresh cider.

  • Main apples:

Core and either half-peel (vertical stripes) or wholly peel the apples.

Slice thin and evenly. I like to use the mandolin, and do ripple cuts, like potato chips, but thicker. The ripples increase adhesion of the slices.

  • “Crust”:

Pound the shortbread into crumb in a mixing bowl with something heavy, I use a meat tenderizer.  Then press 10 ounces or so of the shortbread into the bottom of the pan as a crust – you can come up the side of the pan just enough to make a ridge, but not like a real pie.

OR

Look up a recipe for a sour cream pie crust and make that.  I’ve done it both ways. I made the sour cream pie crust this time.

  • Assembly:

Start layering the thin slices of apples around the bottom, as flat and overlapping as much as possible. Come up about halfway.

Add half the mixture from the pot, then layer in the rest of the apples. At the top, pour over the rest of the mixture, then press the rest of the shortbread crumb around the perimeter of the pan, but not in the middle.  (Or like this time, I made 2 different lid crusts, one latticed, one disk, for the 2 I made).

Bake at 325 degrees for one hour.  Let cool, and then preferably refrigerate before serving with fresh whipped cream.


County Ham, how to cook a

November 25, 2017

How to cook a country ham:

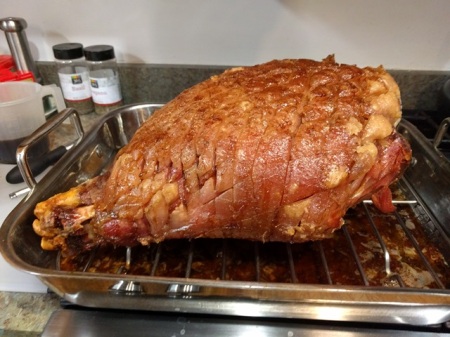
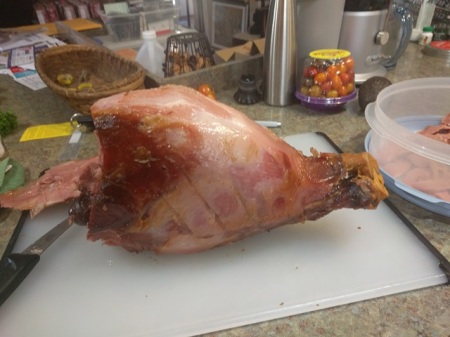
Glazed Country Ham 1

There are very few places left that cure country ham the way they used to when I was a child.  It was a simple process, overall.  Brown sugar and salt, hang the ham in a sack tied off with hemp twine from a rafter in a barn or a curing shed, and wait.  9 months, a year, 2 years.

Most places that do this as a business these days go to extra effort. They may use humidity controlled, temperature controlled buildings. They may add other ingredients to the cure, or other processes.

In recent years there has been an expansion of these and other techniques and there are places that turn out some fancy ham; or prosciutto, or other cured meat product.  And I order and eat these things, and generally really like them.  The Pig, for example, in Chapel Hill makes a prosciutto like country ham that has wide bands of soft gentle white fat and a hard dark red meat. It’s great.

This year when I decided to cook a country ham like I grew up with, I researched where I’d get my ham for a couple of hours on the internet, looking at all the great places, including Edward’s Country Hams (Surry, VA), Johnson County hams (guess where), Smithfield hams, Benton’s Country Hams (TN), etc.

One of my uncles has a Smithfield country ham every year at the holidays on their table, and it’s a good one. I have been personally familiar with the greatness of Edward’s pork products from Virginia for decades.

But at the end of the day I picked up the phone and called Nancy at A.B. Vannoy Hams, as I usually do. It’s a great product at a great price and you won’t be sorry.

Ham Tag

ABVANNOYHAMS

Step one: buy your ham and have it shipped to you.

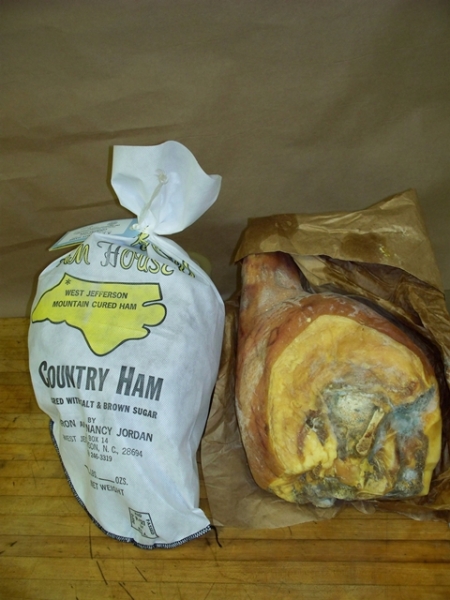
When it arrives it is going to be in a bag, and it is going to be moldy and gnarly and look like ick.  Don’t worry.  Store it somewhere cool per instructions and it will be fine when you need it.

Step two: You want to wash your ham overnight, and then cook the ham on the second day, and then serve it on the 3rd day.

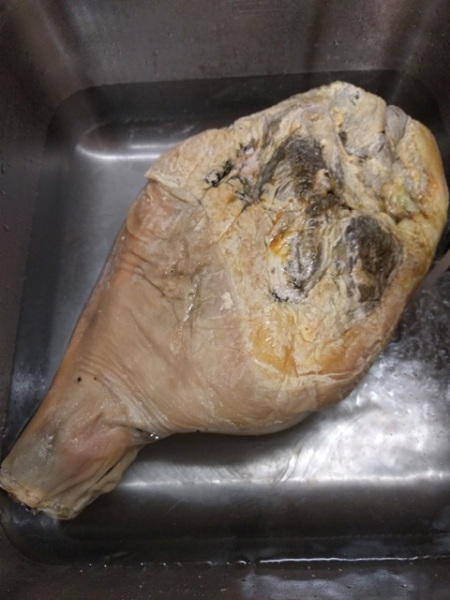
48 hours before you want to serve your ham, take it out of the bag and put it in a sink of fresh water.  I do this to remove all the mold and clean it thoroughly. I’m not really trying to do anything else with it; it doesn’t need brining, ha-ha, and I haven’t noticed that it changes any flavor profiles; it’s just easier to clean by soaking.

First Rinse

(after 1st rinse)

Come back in 6-8 hours and change the water.  Come back in another 8-12 hours and do it again.  I find that anywhere from 2-3 rinses over a 12-16 hr period is more than enough.  An hour before you begin the cooking process, scrub it with paper towels or a rag or a sponge, rinse it off one final time, and remove it from the water and dry it off.

Second Rinse

(after second rinse)

Step Three:  Final preparation

Most folks cut off a few inches on the hock in with a saw.  I don’t because I like the extra length of bone to hold onto as I slice the ham.

There is debate about when to remove the skin.  I prefer to cook the ham in the skin and remove after cooking. You can also cut it off now.  Just below the skin is the fat. If you decide to remove the skin now, be careful not cut too deeply into the fat.  A small curved paring knife is excellent for this.

Washed and ScrubbedTop in Rack2

But me, I don’t do it now, I just wrap the ham completely in heavy duty aluminum foil.  The only seams are near the top of the ham because you want to pour 1 cup of water and 1 cup of red wine (I use sweet Marsala) into the foil with the ham, then finish closing off the foil.

Wrapped in Foil with Water & Wine In the Oven

Step Four:  Cooking the Ham

Put into a roasting pan on an elevated cooking rack, and bake in the oven for 17-20 minutes per pound at 325 degrees.  A 15-lb ham will therefore take about 4 hours and 15 minutes to 5 hours.

Make some strong coffee and set aside, 3-4 cups.  This is for step 5.

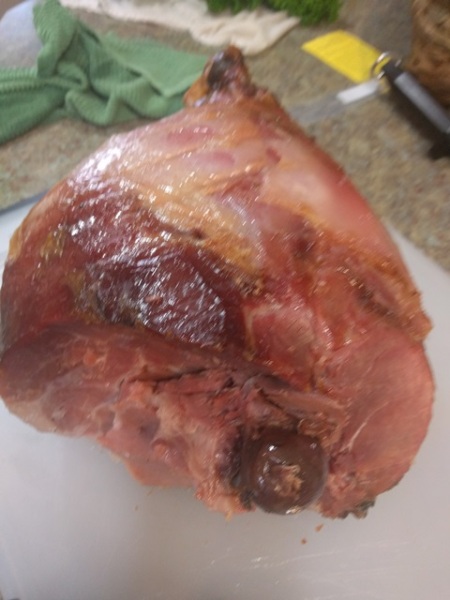
At the end of the cooking time take it out.

Peeling off Foil & Skin

(peeling skin on left, see the skin still on the right side)

Fat on top, skin on front side peeling

(skin still on lower right side)

Skill peeled off

Bowl of skin & foil

(lots of skin and bits and foil)

Remove the foil, and now skin the ham. Score the fat.

Skill Peeled off2

Side view fat

Fat surface

Right side1

Scored fat close-up

Step Five:  Stop here for a diversion

Make Red-Eye Gravy Glaze:

While this is happened, take a iron skillet or a stainless steel one to make the Glaze.

Melt 3 cups of dark brown sugar and ½ lb of unsalted butter in the skillet.  Add some of the ham drippings (no more than 1 cup) and bring to a bubble. Thickly coat the surface of the pan with ground black pepper.  Add the coffee to deglaze and start stirring.  Stop and coat the surface of the pan again with ground black pepper. Do this one more time. Reduce the mixture in the pan until it is about the thickness of A1 sauce.  Turn off heat and let it cool off and thicken a bit.

Cooking the Glaze

This is also called red-eye gravy.  You can serve it with the sliced ham, or spread some on biscuits when you make ham biscuits.

Back to the ham!

Put it back on the rack in the roasting pan minus any foil.  Spoon the glaze over the ham.

Scored fat with glaze 2

Glazed close-up

Turn the oven up to 450 degrees and re-bake the ham uncovered for about 8 minutes.  This should be long enough to fix the glaze.

Take it out and let it rest for a few hours.  After this, you can slice and serve any time you want.  There are any number of online videos on how to cut up a ham.  I learned the most from watching butchers debone a ham rather than those tidy little 3 minute videos where they show you how to cut a wedge on a ham.  My advice is to make sure you have at least an hour of time to slice the ham, and use *sharp* knives.  You will want to slice the ham as thin as you possibly can, and against the grain.  Some people say that you want to slice country ham at about one-quarter inch thickness.  They are wrong.  1/16th is more like it, as near to shaving it and still having a coherent slice as you can cut.  As you carve the ham and get tired you will want to make thicker slices – resist this.  Pretend you have to serve 100 people with this ham, and therefore it needs to be sliced as thinly as possible.  Your guests will thank you for your labors later.

Right side end removed down to HipJoint2

(ready to slice, I trimmed a lot of the thickness of the fat off, but feel free not to)

Carving Ham turned on narrow side

Carving the Ham 1Starting Slices

Pile o' Country Ham 2

ENJOY!

Pimento Cheese is Pimiento Cheese

June 24, 2017

A southern dish rarely seen outside of the regional area1, “puh-MINT-oh” cheese is a standard on the southern picnic list with potato salad and cold fried chicken.

There are so many ways that folks eat pimento cheese:

On a cracker

Pimento cheese sandwich, often toasted, frequently grilled

Put it in olives or spread it on celery

Add it in place of cheese on most any dish, particularly if the cheese part is a condiment

And many others

There are vastly more pimento cheese Recipes than there are ways to eat it, probably one recipe for every family that makes it. This makes a post on pimento cheese both ubiquitous and somewhat arrogant. I can’t remember how many times I’ve heard someone claim that their (insert: family title/name of relative here)’s pimento cheese is FOR REAL the best ever.

Well so is mine.

At its root, pimento cheese is cheese, chopped pimiento peppers, and a little mayonnaise. And not even the mayonnaise is sacred.

So let’s dissect some recipes and see what kinds of things might make a good pimento cheese.

First let’s look at a long list of ingredients:

Pimientos:

I’d say that 95% of all local pimento cheese recipes use those red pimientos in a jar. I do this myself mostly.

OLYMPUS DIGITAL CAMERA

Roasted red peppers:

The other 5% use roasted peppers that you do yourself. Edna Lewis’s2 recipe for pimento cheese is a great example of honest from scratch cooking; it uses mayonnaise you make yourself and tells you how to roast peppers. I strongly recommend her recipe as it has the benefit of being both delicious and rarely duplicated in flavor.

Cheese:

Cheese

Oh which cheese to use? The nearest to truth I’ve been able to discern on the cheese is to use the most common cheese that you really like. I’ve had people swear that medium cheddar is the best, that sharp cheddar is the best, that you can’t really make it without mild, or extra-sharp or <insert type here>.

And while yellow cheese is predominant by volume, the white cheese pimento people strongly like their cheese and there is no use trying to tell them otherwise.

The most common ones I grew up with are NC hoop cheese (mild to medium yellow cheese), and various Medium to Extra-sharp cheddars.

But I’ve made superior pimento cheese using Double Gloucester, Cheshire or other fine English cheeses. Sometimes people use blends – I’ve seen people use cheddar, gruyere and asiago (which seemed like heresy to me but which was decent).

The texture of the cheese seems to be just as important. Is it grated, ground, coarse, or fine? Should it be somewhat dry and granular or should it be like a spread? Try several options and decide for yourself. Personally I think you have to grate it as coarsely as you can – by hand. It’s not as good to me if you use a food processor or blender, and I like to be able to distinguish individual gratings of the cheese in the final product.

There are occasional recipes that use velveeta or other cheese spreads – these invariably come out more like dip, which on occasion may be what you want.

Mayonaise:

If this is going to stay true to form, you probably want to use Duke’s Mayonnaise or Salad Dressing. Hellman’s is good too, or any fine quality mayonnaise. Again, nearly all recipes use some kind of mayonnaise-like substance, though my stepmother has a recipe that swaps out mayonnaise and replaces it with cream cheese.

Some people use a lot of mayonnaise relative to the amount of cheese or other items, but like my potato salad I tend to use only enough to bind the remainder of the ingredients together. I like people to wonder if there is mayonnaise in this thing.

Other ingredients can include but are not limited to:

Worcestershire sauce, Black pepper, Salt, White pepper, Sweet Paprika, Cayenne pepper (or other hotter pepper powders), Vinegar, Hot sauce, jalapenos (chopped), pickle relish (sweet or dill).

More exotic options include cream cheese, onions (ugh), garlic, olives, mustard, lemon, sugar, other herbs or spices. I’ve even seen pimento cheese with curry powder (that one had chopped olives in it as well).

Pimento cheese

So out of all the pimento cheese recipes in the world, here is mine:

Ingredients:

8 ounces medium yellow cheddar, or NC hoop cheese, coarsely grated

16 ounces of aged sharp cheddar, coarsely grated

2 4-ounce jars of diced pimentos, including the liquid in the jar

2 tablespoons of ground black pepper (or more)

2 tablespoons of Worcestershire sauce

2 teaspoons cayenne pepper

1 tablespoon sweet Hungarian paprika (or more)

Mix this all together with a large serving spoon, then add ¼ cup of mayonnaise and stir it in until blended. If the mixture holds together well enough for you, you can stop. Or you can add another spoonful of mayonnaise until it has the consistency you like. I tend to think that less is more in this case.

Chill until served.

The only additional ingredients I ever add myself are either chopped jalapenos (1 cup), or equal amounts of chopped dill and sweet pickle relish (about ¼ cup) but mostly I make it without these extras.

I’ve had plenty of good pimento cheeses that other people make with additional ingredients, but I’m content to let other people make them.

Check your best southern cookbooks to see if they have a pimento cheese recipe. Just remember that the pimento cheese you make yourself is always gonna be better than any you are likely to ever buy.


Fall 2016 Recap – Better Late than Never???

March 3, 2017

As blogging about our gardening adventures has fallen far down life’s priority list, posts have been further and further apart…

Late summer/Fall/early winter 2016 was quite bountiful.  It was quite the fig year for us and we even got a flush of figs in November because of mild temperatures!  We figured out that you can freeze whole figs and use them in fig smoothies – we’ve been enjoying fig/banana smoothies all winter and no more drying necessary!  Here are a few fig harvest pictures:

We also had plenty of herbs, especially sage and parsley for Thanksgiving, along with Thanksgiving broccoli heads.  Peppers were also abundant come September/October and we chop up those we don’t use fresh and freeze the chopped pieces for cooking applications over the winter.

We also harvested plenty of butter beans this year, which we blanch and freeze to enjoy over the winter.  We grew lots of cucumbers because they form the main base of a green juice we drink quite often.  We juiced them and froze them into the amount we use in a batch of juice.  We just ran out of our last frozen portion this week.  This technique worked out great in the juices and saved us quite a bit of money since we weren’t buying cucumber all winter; they actually add up quite quickly at the volume we’ve bought them in the past!  We’re planning on growing an abundance of cucs this year and employing the same juice-and-freeze tactics.

We had a hard time trying to grow melons – watermelons never did form into anything resembling a decent size and, although a number of cantaloupes grew well, the critters beat us to them despite our efforts to protect the melons.  I was really anti-critter for awhile!!  We’ll leave you with a few last harvest pictures.  Hopefully we’ll post a bit more frequently in 2017…maybe we can commit to once every other month???


Early August 2016

August 7, 2016

It’s been only a week since our last post, but I’ve been sick all week and it’s now raining outside so I decided to do a post.  We got our first figs today!  I’ve already eaten three of them and they are delicious.  Technically, some were ready earlier this week and became overripe on the tree (the ants and other bugs love that) so, if I had not been sick and doing only “must do” life things, I would have noticed the ripe figs and picked them earlier in the week.  The two fig trees are loaded with unripe figs, so it looks like it will be quite the fig year, presuming we can beat the critters to the ripe fruit.

We’ve gotten plenty of cucumbers and tomatoes this week as well as the first bell peppers and a few more jalapenos.  I’ve removed a few of the round 1 cucumber vines because they’re really starting to fade.  But the Round 2 vines started producing a couple of weeks ago and the Round 3 vines are getting ready to start making cucumbers.  It’s been a good cucumber year.  Usually Round 1 isn’t still around in August.

We’ve been processing the tomato bounty – we made roasted tomatoes last weekend which ended up in both the freezer for future use and a tomato casserole The Hubs made.  We currently have more tomato sauce cooking down on the stove.  We’ll package the sauce in pint freezer bags and freeze them for future use.  Some years we can our tomato sauce, but it’s really easier to just freeze it.

tomato sauce on the stove

tomato sauce cooking down on the stove

I pulled up all of the basil this morning.  It was infected with basil downy mildew, which apparently is a new-ish basil problem (first recognized in 2007 or ‘08).  Now that I think about it, the previous two years of basil also was done in by this fungus.

We have winter squash growing on the vines!  Winter squash vines are truly amazing.  Some of them are easily 40-feet long.  I’m really hoping the squash come to maturity because having squash detach from the vine before they’re ripe has been a major problem for us during the years, one we have correlated to “too much rain” during some aspect of the fruit’s maturing process.  We’ve gotten a lot of rain this week – 4.5 inches during one evening’s thunderstorms and over an inch just now (it rained for about 45 minutes).  Rain in these amounts is what we think have cause the past problem of fruits detaching from the vine.  Time will tell…

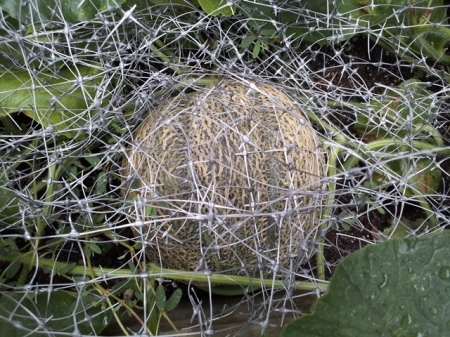
We also have several cantaloupe melons on the vines!  I’ve wrapped them in plastic chicken wire in attempt to deter raccoons, possums, and other critters that love to beat us to our ripe melons.

protected cantaloupe

protected cantaloupe melon

All of the recent rain has caused some mushrooms to sprout.  They’re not edible, but it’s interesting to see the huge variety of mushrooms that exist just in our little corner of the world.

mushrooms (not edible)

mushrooms (not edible!)

The fall crops that I started in the basement under lights at the beginning of July are getting big and I will start hardening them off in the next week or so.  I had not taken any garden pictures for quite some time so I took the camera out with me today to take a few pictures.  Here they are:


Until next time – could be next week, could be months from now – who knows?!

Late July 2016

July 30, 2016

Gardening and all its ups and downs continues here in NC.  We’ve been getting plenty of cucumbers, tomatoes, blackberries, and eggplants.  Basil has been so plentiful that I’ve made pesto twice and gave a large amount of excess basil to a co-worker so she could make enough to last for a year (or more) too.  I also pulled all of the carrots in mid-July and made my Taqueria-style pickled carrots with about 1/3 of them.  The recipe is accessible from the homepage (right hand side).  It’s by far the most popular recipe post we’ve ever made, as far as number of hits goes.

Summer squash was a complete bust this year for some reason.  We got a total of 4 squashes (from 6 plants!) before the plants died due to squash vine borers.  I don’t know what the problem was this year since summer squash is normally so prolific.  It was dismal enough that I seeded a few seeds in the garden about 3 weeks ago in the hopes we might be able to finagle a second round of summer squash somehow.  Time will tell…

I just finished blanching quite a few butter beans, in preparation for freezing.  There are more pods to be harvested tomorrow.  I need to get out into the garden early since it’s summer in NC and it’s particularly hot/humid right now.

We recently dug up the rest of the potatoes (Red Pontiacs and Kennebecs) and they’re curing in the basement.  We were quite satisfied with this year’s harvest amounts.  The onion harvest was also quite good this year and we chopped most of the onions and froze them – we have 4 gallon bags in the deep freeze!  That’s almost twice as much as previous years, from the same number of plants.  This will easily meet our onion needs for the year.

cured onions

Some of this year’s cured onions

Winter squash plants are running and we have at least 3 fruits that I’ve seen.  Hopefully they’ll make it!  We also have at least one cantaloupe melon that’s formed.  For some reason, the watermelon plants aren’t doing so great, but this is a common problem us.  I mostly plant watermelon just to see if they’ll make anything in a particular year – actually getting a melon would just be a bonus 🙂

We’re still having some deer predation problems but, finally, the Japanese beetle season came to an end just within the past couple of days.  It seems to have been quite a long beetle season this year – at least 8 weeks.

Fall crops (cabbage, broccoli, cauliflower, etc.) were started in the basement under lights in early July and are doing well.  It’s hard to believe they get transplanted out in just 3 weeks, weather cooperating.  Time just keeps marching on – I can’t believe that we’ve been actively gardening for 8 solid years now!

Here’s a sampling of the rest of the harvest for the past few weeks:

We hope your garden is providing a bounty as well!

Early Summer 2016

June 19, 2016

We’ve been gardening away this month with lots of harvests and some frustration with deer.  We cut the last of the cauliflower and, likely, cabbages – there are still two small cabbages out in the garden but they’re likely to remain small at this point, we’ll see.  Lettuce, various greens, radishes, beets, turnips, and cilantro also ended earlier this month.  Friends and co-workers happily partook in the last of the lettuce harvest for the season.  We made a Mexican-style slaw a couple of times with many of the cabbages and cilantro.  Most of the greens were juiced and frozen for future addition to the green juices we make regularly.

Firsts also happened – notably the first cucumbers, haricots verts, and celery.  Today, we canned the first 5 pints of haricots verts for the season.  We’re growing far fewer of these beans this year since we still have plenty of canned beans from last year.

Our frustration with deer has been considerable as they’re the most likely culprits in some tomato damage we experienced.  They’ve also been nibbling on our field pea leaves and carrot tops (pulling up some of the small carrots in the process).  Some sort of critter (likely deer, given the tracks we saw) ate a few of the green tomatoes and left some intact ones on the ground.  We picked up the intact tomatoes and brought them inside to (hopefully) ripen on the counter.  So far, one has!  Does this count as the first tomato of the season???

first tomato

First tomato of the season??  It had to ripen on the counter.

We bought and sprayed deer repellant a couple of times out of desperation.  This has got to be the most putrid smelling product on earth!  I know it would keep me out of the garden!

Yesterday, we dug up almost all of the Yukon Gold potatoes and used some of them to make a delicious potato salad that included some of our own celery.  The remainder of the Yukon Golds are curing in the basement.  We still have Kennebecs and Red Pontiacs growing in the garden but they haven’t died back much yet so they’re likely two weeks or so out from being dug up.

We’ve been pulling up the “Candy” onions as the tops fall over and they’re currently curing under cover.  This year’s Candy onions are the largest we’ve been able to grow – some are even a respectable size!  We don’t know what was different this year since we grew them exactly the same as we’ve done in past years…

The Yellow Granex onions fell over much earlier than the Candy variety and they’ve been cured and clipped for at least two weeks now.  We made a yummy onion soup with some of the Yellow Granex onions.  Later today we’ll process the remaining Yellow Granex onions along with the Candy variety that are already cured by chopping them in the food processor and freezing them for future use.

We spend most weekend mornings in the garden tending and harvesting – it’s nice to get out before it gets too hot!  Japanese beetle season also started about 2 weeks ago which means that every morning before work, she’s outside shaking beetles into a bucket filled with a couple of inches of water before disposing of the beetles in a plastic bag.  It’s amazing how many beetles are on our fruit trees and berry canes every morning!  We have about 4 more weeks of Japanese beetle season.  It can’t end soon enough!

In our last post, we mentioned that we expected our first summer squash very soon.  That didn’t happen as the first fruits were not pollinated and they shriveled once they got to be about 3 inches long.  We still haven’t gotten any summer squash but the first patty pan squash is really almost ready.

Happy gardening until next time!

Spring 2016

May 29, 2016
2016-03-31 08.48.53

Tulips in Late March

We’ve been busy in the garden the past couple of months.  Harvesting, planting, weeding – it’s Spring!  Although the pea year was a bit if-fy, the two types that were most productive provided plenty of peas the past month.  Pea season is just about over and we plan on pulling up the plants in the next couple of days.  We had planned to do it today but it looks like it’s going to rain most of the day, so we may not be able to do it today.

In early April we pulled up the leeks that had been growing for more than a year and removed the last small square box that had been in our front yard.  We just don’t need as much growing space as we had made a few years ago.  We made a delicious potato-leek soup with the leeks.

We had a fairly significant hail storm in late April.  These are really uncommon in North Carolina – a once-a-decade event.  Many of our plants were damaged but most recovered.  We ended up losing just 3 or 4 plants; fortunately, nothing too critical (like a tomato plant!).  Here are a couple of pictures of the hail:

Since we started growing only hybrid cabbages, broccoli, and cauliflower a couple of years ago (after trying primarily for heirlooms for several years), we’ve gotten very reliable harvests of these crops and we have plenty of all of these veggies in the ‘fridge right now.

As is usual, lettuce has been abundant and we’ve shared plenty with friends and co-workers.  We’ve also harvested plenty of greens (kales, mustard, and turnip greens), radishes, and herbs such as parsley and cilantro.  We made tabouli twice with all of the volunteer parsley we cut a month or so ago.  It was delicious.  We got a fair amount of asparagus this year as well.

In the past week, we pulled up the yellow granex onions and they’re currently curing.  None of them are huge, but we’re content with the fairly uniform size this year – in the past, some of our onions have been really small and we’ve never gotten truly large ones.  But a bunch of medium ones add up to a decent amount of chopped onions, which we freeze and use as needed; we grow almost all of our own onion needs each year.   The tops of the other onion type we’re growing (Candy) haven’t fallen over yet, so they’ll take a bit longer.

We’re just a few days out from cutting our first zucchini of the year and cucumbers should also be ready for the first time by the end of the week!  The haricots verts (French green bean) plants have recently bloomed so fresh beans aren’t far off either.  As the early Spring crops come to an end, the early Summer stuff starts coming in.  It’s great to eat seasonally!  Our first green tomatoes made their appearances a couple of weeks ago so we may have an early tomato year this year.  We’ll see…

Here are some other pictures from the garden in the past couple of months.  Happy gardening until next time!


Until Such Time…

April 15, 2016
2016-03-31 08.51.31

Kleo on her last day (October 16, 1998 to March 31, 2016)

My old dog recently passed from the Earth and we are slowly adjusting to a “new normal.”  I try to rejoice in all the years we had together instead of dwelling on the little piece of my heart that is now missing.

It’s going to be a very different to not have my faithful dog following me around in the garden until finally deciding to lay down and bask in the sun while watching me when wandering in the garden got too boring.

Someday we, and all of the other critters that have graced my life, will meet again at Rainbow Bridge…

Still Gardening

February 14, 2016

Well, obviously blogging isn’t one of our priorities anymore since our last post was ages ago, but we’re still gardening and enjoying the fruits of our efforts. Figs were prolific last year, so much so that we dried figs and still have some stored in the freezer. It was also an excellent blueberry year and we only recently used the last of the frozen berries.


blackberries &amp; blueberries

Blackberries & Blueberries

blueberries

Blueberries

figs

Fresh figs

dried figs

Dried Figs

We also had good success with cabbage, broccoli, and cauliflower this year. It was really good growing weather for these crops as it was cool but not too cold through December.

November cabbages

November Cabbages

broccoli

Broccoli

Seed starting in the basement under lights began for late winter/early spring crops last week and each week for the next month we start more types of crops. We also seeded shelling, sugar snap, and snow peas in the beds on January 30th, based on very favorable weather forecasts. Of course, those forecasts proved to be wrong and it’s been much colder than projected the past couple of weeks. Had we known, we wouldn’t have seeded so early. None of the pea seeds have sprouted so there’s a chance that they’re just hanging out under ground waiting for more favorable temperatures. Peas are usually a challenge for us in North Carolina because spring can be very short so it gets too hot before peas can really produce well.

In other news, our dog turned 17 years old in mid-October. Here’s a picture of her taken over Thanksgiving weekend.

2015-11-27 16.02.10

Old Dog

At this point, she’s 17 and 4 months. Wow. She looks it and has some mobility problems (our hardwood floors are covered with various runners and rugs to help her out), but she’s not ready to go yet either.

Santa brought us a fermentation kit this past Christmas and we’re trying our hand at fermenting one of our homegrown cabbages. It’s been going for 2 weeks and earlier today we opened the jar for the first time and tried it. So far, so good, but it needs to ferment longer in order to get more tangy.

Here are some of the random pictures we took of last summer/fall’s harvests (July through December):

Until such time…FoodGardenKitchen